When you delete content in WordPress, it typically goes into a “trash” folder rather than being permanently deleted. This allows you to recover accidentally deleted content or change your mind about deleting something. However, WordPress automatically empties the trash folder after a certain amount of time (by default, 30 days), which means that any content you have deleted beyond that time limit is gone for good.
While this feature can be useful for keeping your site tidy and reducing clutter, it can also be a problem if you accidentally delete something important and don’t realize it until after the trash has been emptied. In this blog post, we’ll discuss how to limit or disable the automatic trash emptying feature in WordPress, so you can have more control over what content is permanently deleted from your website.
What Is WordPress Trash?
WordPress first had a garbage feature in version 2.9. It functions similarly to your computer’s recycle bin or trash.
When you delete content in WordPress, it is moved to the “trash” folder, which serves as a temporary holding place for deleted content. This allows you to recover accidentally deleted content or change your mind about deleting something.
By default, WordPress automatically trash folder every 30 days, permanently deleting any content that has been in the trash for that length of time. This is done to help keep your website clean and organized, as well as to prevent the trash folder from taking up too much storage space on your server.
It’s important to note that the trash folder is not the same as permanently deleting content. When you permanently delete content in WordPress, it is immediately and permanently removed from your website and cannot be recovered.
The trash folder does have limitations. For example, it only applies to certain types of content, such as posts and pages. Other types of content, such as media files and comments, are not automatically sent to the trash folder when deleted. Additionally, the trash folder has a finite storage capacity, so if you delete a large amount of content, it may not all be able to fit in the trash folder before it is automatically emptied.
You can access them from your WordPress dashboard by navigating to Posts > All Posts and then picking the ‘Trash’ option.

Your WordPress website will erase anything in the trash after 30 days to prevent it from piling up.
What if you don’t want WordPress to delete garbage things automatically? Possibly you’d like it to be emptied more frequently or less frequently than once a month.
Let’s take a look at how you can have it emptied automatically as often as you want.
Method 1: Using a Plugin to Change When WordPress Trash Is Emptied
You must first install and activate the Adjust Empty Trash Time plugin. For more information, visit our step-by-step guide to installing a WordPress plugin.
After activation, go to your admin dashboard’s Settings » General page. When you get there, scroll down to the bottom of the page to find a new ‘Time to empty garbage (in days)’ setting.

Simply enter the number of days you want WordPress to take to empty the garbage. You can, for example, type 1 for daily, 7 for weekly, or 30 for monthly.
If you choose 0, removed posts and pages will be permanently erased rather than being tossed in the trash.
Take special care while setting the time to empty to 0. Permanently deleted posts and pages can be difficult to retrieve. Make sure you have a backup plugin installed just in case.
Don’t forget to save your settings by clicking the ‘Save Changes button.
Method 2: Using Code to Change When WordPress Trash Is Emptied
You can also use a code snippet to control how frequently the garbage is cleared. This method is not suggested for novices; instead, if you are unfamiliar with programming, use Method 1.
You’ll need to make changes to your wp-config.php file for this method.
If you’ve never edited the wp-config.php file before, see our instructions on how to edit the wp-config.php file in WordPress.
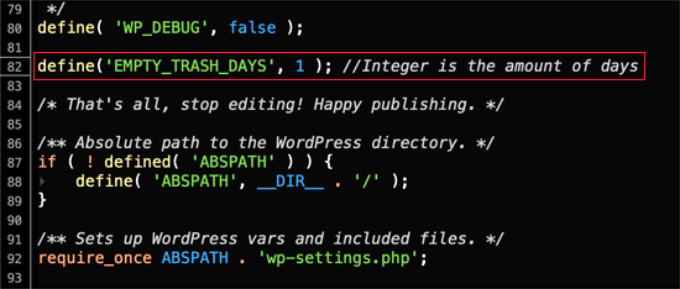
Simply insert the following code into your wp-config.php file.
| 1 | define('EMPTY_TRASH_DAYS', 1 ); //Integer is the amount of days |
That should be near the conclusion of the file, just before the line that says, ‘That’s all, finish editing!’ ‘Good luck with your blogging.’

If you leave this code snippet alone, your garbage will be cleared once each day. Change the number 1 to a different number, and the garbage will be emptied after that number of days.
If you don’t want to use the garbage option at all, set the value to 0. Deleted posts and pages will be permanently removed without being placed in the trash.
Before you begin, make sure you have a backup plugin installed in case you need to recover any mistakenly erased pages.
Once you’ve made your changes, remember to save the wp-config.php file.
Method 3: Disabling WordPress’s Automatic Trash Emptying
Do you want WordPress to cease automatically eliminating garbage items?
In the functions.php file of your theme, paste the code below. If you’re unfamiliar with modifying core WordPress files, see our instructions on copying and pasting code snippets from the web.
We don’t normally recommend directly altering your site’s theme files. The smallest error might destroy your website. WPCode is a superior option for adding code snippets.
You must first install and activate the free WPCode plugin.
Then, from your WordPress dashboard, navigate to Code Snippets » + Add Snippet and select the ‘Add Your Own Code (New Snippet)’ option.

The next step is to give your code snippet a title.
Then, copy this piece and paste it into the ‘Code Preview’ box.
1 function wpb_remove_schedule_delete() {
2   remove_action( 'wp_scheduled_delete', 'wp_scheduled_delete' );
3 }
4 add_action( 'init', 'wpb_remove_schedule_delete' );
This code just disables the action that deletes discarded objects when their timer expires.
Don’t forget to choose the ‘PHP Snippet’ option from the ‘Code Type’ dropdown menu.

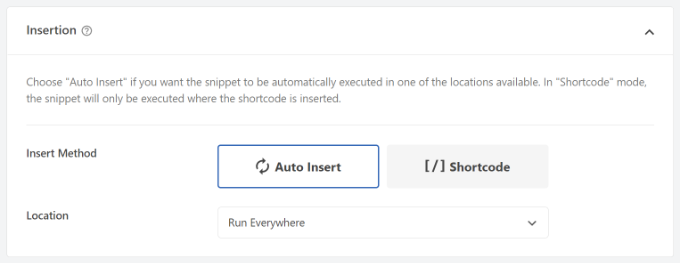
After that, scroll down to the ‘Insertion’ area to see other possibilities, such as where and how to put the code.
We recommend leaving the default settings alone. The plugin will Auto Insert the code and run it throughout your website.

Then, to make your code snippet Active, click the toggle.
After you’re finished, simply click the ‘Save Snippet’ button at the top.

When you send something to the trash, it will now stay there until you view your trash files.
You can delete any post by clicking the ‘Empty Trash’ button on this page.

Wrapping Up
The automatic trash emptying feature in WordPress can be both helpful and frustrating. While it can help you keep your site clean and organized, it can also result in accidentally deleted content being permanently lost.
By limiting the number of days WordPress keeps items in the trash or disabling the automatic trash emptying feature altogether, you can have more control over what content is permanently deleted from your website. It’s important to consider the potential drawbacks or risks of these actions.
If you choose to limit the number of days WordPress keeps items in the trash, be sure to determine an appropriate time limit for your website based on your needs and how often you delete content. If you choose to disable the automatic trash emptying feature, be aware that this means deleted content will stay in the trash folder indefinitely and could potentially take up a significant amount of storage space on your server.
Whether you choose to limit or disable the automatic trash emptying feature, it’s important to understand how it works and how it affects your website. By taking control of your WordPress trash, you can ensure that your site stays organized and that important content is never permanently lost.
