How To Add Box Shadow In WordPress?

A reader asked if there is a simple way to add box shadows to their WordPress website. Box shadows can be used to highlight important content and make flat designs more visually appealing. Here are the steps to add box shadows in WordPress.
Why Do You Need Box Shadows in WordPress?
Box shadows are a design element that can add depth, dimensionality, and visual interest to website layouts. In WordPress, box shadows can be applied to various elements such as buttons, images, headings, and more. They are a simple and effective way to improve the overall appearance of your website and make it more visually appealing.
Here are some reasons why you might want to use box shadows in WordPress:
- To create a sense of depth: Box shadows can be used to create the illusion of depth on a web page. By adding a shadow behind an element, it can appear as if it is floating above the background, which can make the design feel more immersive and dynamic.
- To improve readability: Box shadows can also be used to enhance the readability of text. By adding a subtle shadow behind the text, it can make it stand out more against the background, which can improve legibility.
- To add emphasis: Box shadows can be used to draw attention to specific elements on a page. By adding a more prominent shadow to an element, it can make it stand out from the surrounding content and become more eye-catching.
- To create a more modern design: Box shadows have been a popular design trend in recent years, and using them on your website can give it a more contemporary and stylish look.
The two common methods for adding a box shadow effect to elements in WordPress are using CSS and using a plugin. While CSS allows you to customize the box shadow effect using code, plugins offer a more user-friendly way to add box shadows to your website without needing to write any code.
Method 1 – How Do You Add Box Shadows Using Code?
When it comes to boxing shadows, the best practice is to only use them on the most crucial website elements. If you apply a different shadow effect to each WordPress block, your site will seem cluttered and confused.
It’s also critical to maintaining your box shadows consistent throughout the site. The simplest method to accomplish this is to define the style in CSS with WPCode.
WPCode is the finest code snippets plugin, with over 1 million WordPress sites using it. It makes it simple to add custom code to WordPress without editing the functions.php file.
WPCode allows even novices to update their website’s code without risking blunders and typos, which may lead to numerous frequent WordPress issues.
The first step is to install and activate the free WPCode plugin.
After activation, navigate to Code Snippets » Add Snippet.

Hover your cursor over ‘Add Your Custom Code’ to get started.
When it displays, click the ‘Use snippet’ button.

To begin, give the custom code snippet a title. This might be anything that aids in the identification of the snippet on the WordPress dashboard.
Then, under the ‘Code Type’ field, pick ‘CSS Snippet.’

Insert the following code snippet into the code editor:
1 .shadow-effect {
2 box-shadow: 5px 5px 0px 2px #a9a1a1;
3 }
Depending on the type of shadow you want to produce, you may need to modify the px values in the following excerpt.
To assist you, below are the different px values, from left to right:
- Offset horizontally. When you enter a positive value, the shadow moves to the left. If you provide a negative number, such as -5px, the shadow will be moved to the right. If you don’t want to employ a horizontal offset, use 0px instead.
- Vertical offset– If you choose a positive value, the shadow will be pushed downwards. If you enter a negative value, the shadow will be pushed higher. If you don’t want to offset the shadow vertically, enter 0px.
- Blurred radius– This softens the shadow’s edges. The bigger the value, the greater the blur effect. If you want sharp edges, enter 0px.
- Spread radius– The bigger the value, the broader the dispersion of the shadow. If you don’t want to show a spread, skip this setting.
- Color– Although grey is the most commonly used color for shadows, you may use any color by entering a hex code. If you’re not sure what code to use, you may experiment with different colors by utilizing a site such as HTML Color Codes.
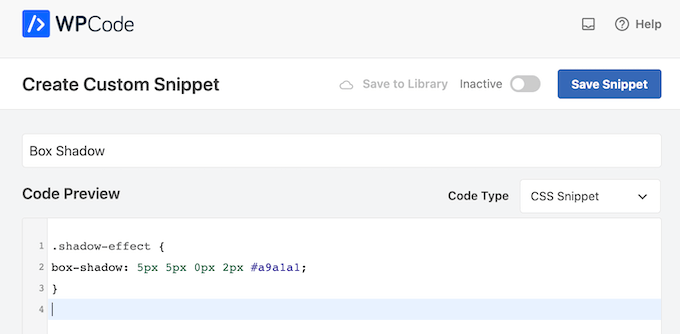
When you’re finished with the sample, move on to the ‘Insertion’ part. WPCode allows you to add your code to several areas, such as after each post, the front end only, or the admin alone.
Because we want to use the custom CSS code throughout our WordPress website, select ‘Auto Insert’ if it isn’t already chosen. Then, select ‘Site Wide Header’ from the ‘Location’ dropdown option.
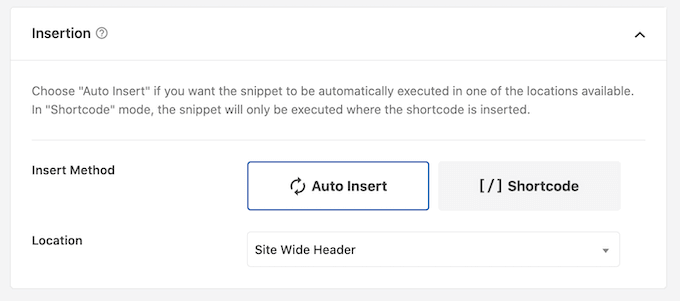
After that, navigate to the top of the screen and click on the ‘Inactive’ toggle to make it ‘Active.’
Finally, click ‘Save Snippet’ to publish the CSS snippet.

You may now apply the custom CSS class to any block.
Simply choose the block where you want to add a box shadow in the WordPress content editor. Then, in the right-hand menu, expand the ‘Advanced’ section by clicking.

You’ll see areas where you may enter different classifications.
Enter shadow-effect in the ‘Additional CSS Class(es)’ field.
Method 2: Create a Box Shadow using a Free Plugin
If you’re not comfortable writing code, you could want to use Drop Shadow Box to produce shadows. Using the built-in WordPress page and post editor, you can apply box shadows to any block with this free plugin.
Installing and activating the plugin is the first step.
Because there are no settings to configure, you may begin using this plugin right away.
To create a drop shadow, click the ‘+’ symbol and begin entering the ‘Drop Shadow Box.’ When the appropriate block appears, click it to add it to the page or post.

This inserts the drop shadow as an empty box, therefore the next step is to fill it with anything.
To do so, click the ‘Plus’ icon inside the Drop Shadow Box block.
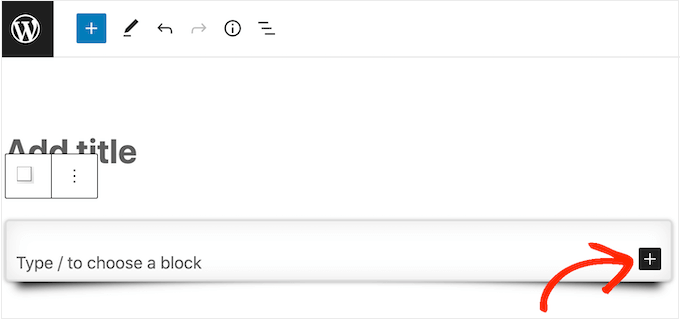
This inserts the drop shadow as an empty box, therefore the next step is to fill it with anything.
To do so, click the ‘Plus’ icon inside the Drop Shadow Box block.

After that, pick the Drop Shadow Box block by clicking. All of the styling options for this block are available in the right-hand menu.
WordPress determines the width of the shadow automatically, but you can adjust it by accessing the ‘Width’ option and selecting either ‘Pixels’ or ‘%.’
You may then resize it using the available options.
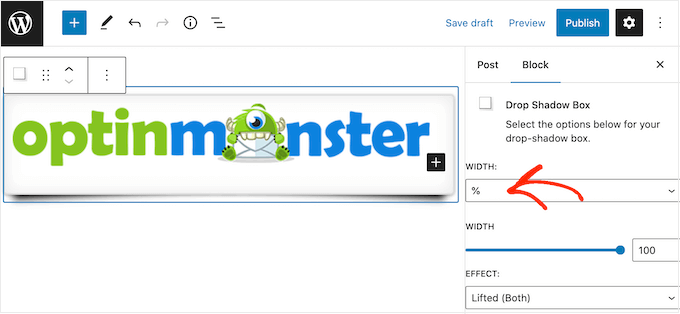
The Drop Box Shadow plugin includes several effects, including curved edges and an eye-catching ‘Perspective’ effect.
Simply open the ‘Effect’ menu and select from the list to examine the various effects. The sample will automatically refresh so you can experiment with several designs to discover which one you like.

Using the ‘Inside Shadow’ and ‘Outside Shadow’ toggles, you may also modify whether the plugin displays the shadow inside the box, outside the box, or both.
Then, using the options under the ‘Colors’ header, you may modify the colour of the box and border.
Just keep in mind that the term ‘Background’ refers to the inside of the Drop Shadow Box, whilst ‘Border’ refers to the outside of the block.

You may activate the ‘Rounded corners’ option to produce a softer, curved shadow box. Finally, you may modify the orientation and padding, just like you do with other WordPress blocks.
To make more box shadows, simply repeat the technique outlined above.
When you’re satisfied with how the page appears, just click ‘Update’ or ‘Publish’ to activate all of your new box shadows.
Wrapping Up
Overall, adding box shadows to your WordPress website is a great way to enhance the design and make it stand out. They can be used to create a sense of depth, add emphasis to important elements, and make your site look more polished and professional. So, whether you’re looking to create a modern, minimalist design or something more bold and eye-catching, box shadows are a versatile tool that you can use to achieve your desired look and feel. By experimenting with different shadow styles and applying them to various elements on your website, you can create a unique and visually appealing design that captures your brand’s personality and engages your audience.