
One approach to ensuring that your readers don’t miss out on your most recent content is to highlight the posts that have just been published on your website.
This tutorial will walk you through the process of using WordPress to make fresh content stand out to returning visitors.
Why Should Your WordPress Website Feature New Posts?
Adding a post highlight to your WordPress website makes it easier for frequent users to find your updated material. They won’t be unaware of any new content or changes you post on your blog in this manner.
Your WordPress website’s user experience will be enhanced by labeling new content. Returning visitors can quickly identify which items they haven’t read on your website, which will save them a ton of time and boost pageviews.
In addition to keeping users satisfied, providing a positive user experience on your website also benefits SEO. Easy-to-use websites boost search engine rankings and increase the possibility that users will locate your material.
In light of this, let’s examine how to use WordPress to showcase fresh content for frequent readers.
Here are two approaches for you: one using code and the other using a WordPress plugin. Using the quick links below, you can go directly to a certain method:
Approach 1: Use a WordPress Plugin to Draw Attention to New WordPress Posts
The Mark New Posts plugin is used in the first way. We suggest it for total novices due to its simplicity. This plugin will include a label that indicates which blog entries visitors to your website haven’t yet viewed.
Installing and activating the Mark New Posts plugin is the first step.
After that, from the WordPress admin area, select Settings » Mark New Posts. The settings page for the plugin will now appear.
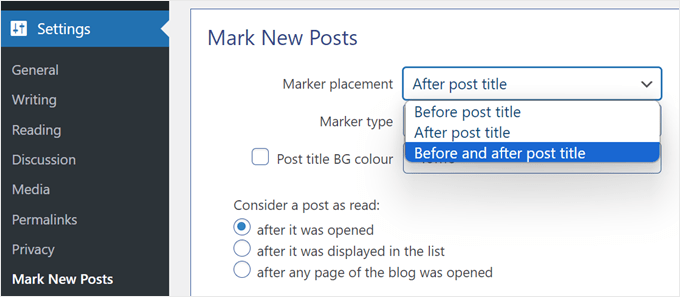
The next thing you need to do is choose where the “New” label will appear. You have the option to choose Before, After, or After and After the post title.
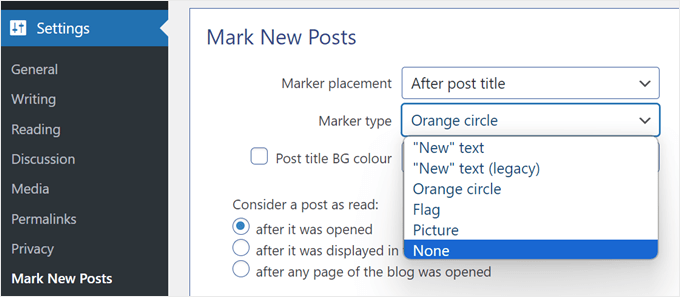
The next step is to select the marker’s appearance under the Marker type setting. “New” text, “New” text legacy, Orange circle, Flag, Picture, and None are the available options.
Make sure to investigate each choice to see which complements the design of your website the most.
You can also change the background color of the title of the new post. If you activate this, readers will notice that the post title section has a background color whenever they visit a new post. We turned off this setting since we didn’t think it was needed.
You can select when to disable the new post label in the “Consider a post as read” setting. This can be done after the post has been opened, after it has been listed, or after any blog page has been accessed.
We advise choosing “after it was opened.” This implies that the new post label for the previous articles will remain visible if a visitor opens one without having read the others.
Next, you can disable the new label for custom post kinds, choose how long the post should be highlighted as new, and choose whether to show all previously published posts as new to visitors.
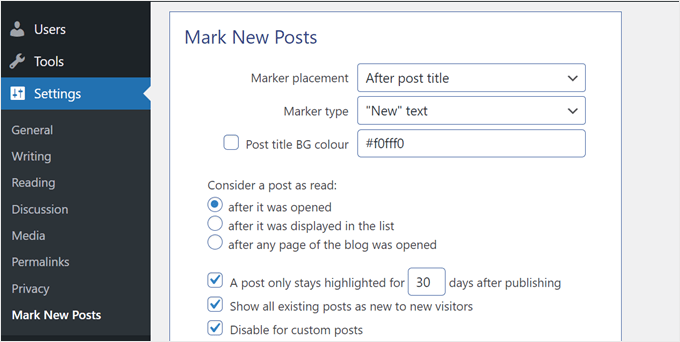
The other option, “Use JavaScript for showing markers,” is only advised in the event that the plugin is incompatible with your blog’s theme or other plugins. Generally, you should leave this setting deactivated.
Click “Save” when you are finished adjusting the plugin’s parameters.
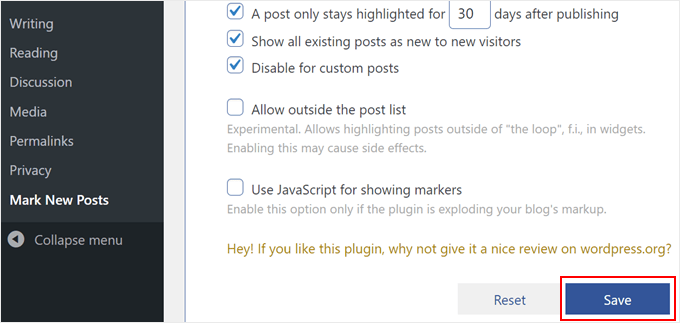
That is all! In order to verify whether the updated labels for the most recent posts are active, go ahead and view your website in private mode.
Approach 2: Use Custom Code to Emphasize New Posts
Do you not like the new post-label options that the prior plugin offered? If so, you can use custom code to highlight new posts instead.
This approach could seem scary to novices. But don’t worry, we’ll carefully inject code snippets into WordPress without causing any damage to your website by using the WPCode plugin.
Additionally, since we will be using numerous custom code snippets, WPCode makes it simple to handle a multiple of them, which will come in handy.

Although WPCode has a free edition, we will use WPCode Pro since it enables you to place the code snippets in the right places for this tutorial.
Installing WPCode in WordPress is the first task you must complete. Check out our post on how to install a WordPress plugin for setup instructions.
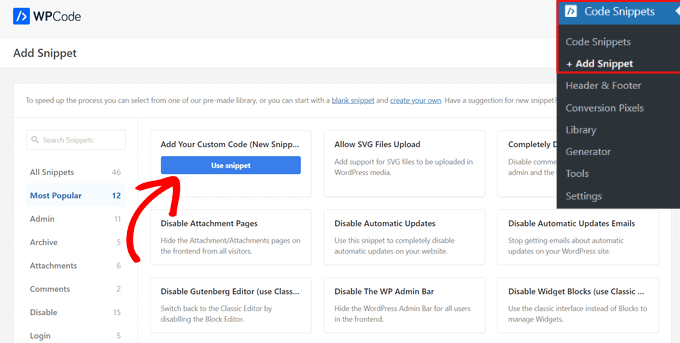
Next, from your WordPress dashboard, select Code Snippets » +Add Snippet. Click “Use snippet” once you’ve chosen “Add Your Custom Code (New Snippet).”
Next, choose “PHP Snippet” from the Code Type menu.
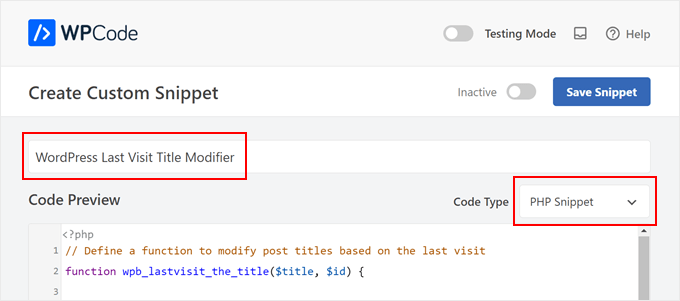
Following that, you can copy and paste the following code fragment:
// Define a function to change the title of posts according to the most recent visit.
functionwpb_lastvisit_the_title($title, $id) {
// Determine whether the page is a single page, a page post type, or not in the loop; if so, return the original title.
if(!in_the_loop() || is_singular() || get_post_type($id) == 'page') return$title;
// Check if no 'lastvisit' cookie is set or if it is empty; if true, set the cookie with the current timestamp
if(!isset($_COOKIE['lastvisit']) || $_COOKIE['lastvisit'] == '') {
$current= current_time('timestamp', 1);
setcookie('lastvisit', $current, time() + 60 * 60 * 24 * 7, COOKIEPATH, COOKIE_DOMAIN);
}
// Retrieve the 'lastvisit' cookie value
$lastvisit= $_COOKIE['lastvisit'];
// Get the publish date of the post (in Unix timestamp format)
$publish_date= get_post_time('U', true, $id);
// If the post was published after the last visit, append a new span to the title
if($publish_date> $lastvisit) $title.= '<span class="new-article">New</span>';
// Give back the updated or original title.
return$title;
}
// Add a filter to apply the 'wpb_lastvisit_the_title' function to 'the_title' hook with priority 10 and 2 parameters
add_filter('the_title', 'wpb_lastvisit_the_title', 10, 2);
This snippet adjusts WordPress post titles according to the user’s most recent visit.
It determines whether or not the page is a blog post, and if not, it shows the original title exactly as it was. If, however, it’s a blog post, the title will change.
The snippet then confirms that the last visit cookie is present. The code builds it and changes it to the current time if it doesn’t. The function then looks up the post’s publish date using this last visit time, and if it is older than the last visit, it appends a ‘New’ label to the title.
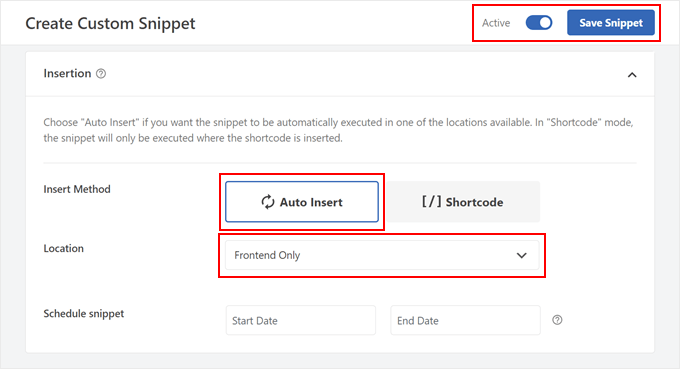
Simply scroll down and choose “Auto Insert” for the Insert Method after inserting the code snippet.
Thus, you may call it “Post Title New Label Style” and “CSS Snippet” should be the Code Type.
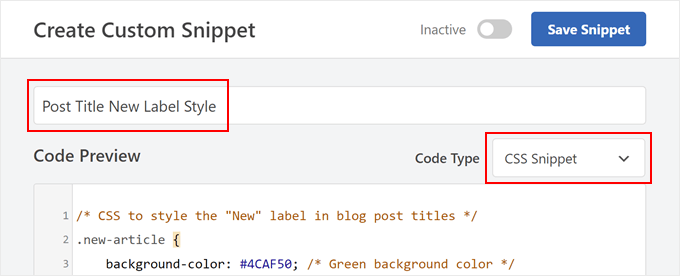
Next, you can copy and paste the subsequent code lines into the Code Preview window:
/* CSS to style blog post titles with the "New" label */
.new-article {
background-color: #4CAF50; /* Green background color */
color: #ffffff; /* White text color */
padding: 2px5px; /* Padding around the label */
margin-left: 5px; /* Adjust the margin to your preference */
border-radius: 3px; /* Rounded corners for the label */
font-size: 12px; /* Adjust the font size to your preference */
This little piece of code simply sets the background color, text color, padding, margin, border radius, and font size of the “New” post label to your own preferences.
As you work, feel free to change these components to suit your tastes. Just be sure that the background and text colors are either RGB values or hex color codes.
Choose “Site Wide Header” as the Location in the Insertion section. After that, click “Save Snippet” and set the code to “Active.”
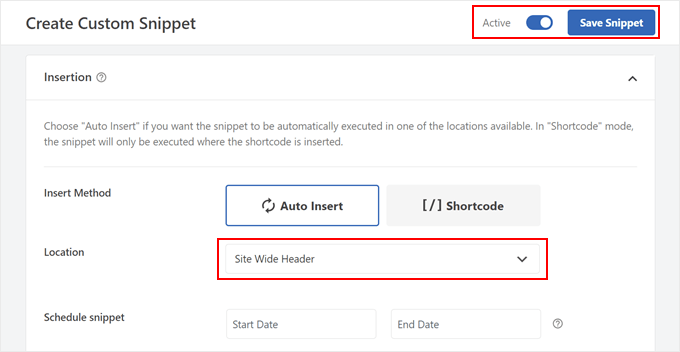
That is all! You can publish a new blog post and visit your website in incognito mode to check if the code is functioning.
Your recent post titles should have a “New” label next to them if the code is successful.
We hope that this article has helped to teach you how to use WordPress to promote new content for returning users.