Do you own an online store? Do you want to sell more goods or services? Did you say yes to either of those questions? In that circumstance, a sales funnel is required.
A WordPress Sales Funnel is the most effective approach to selling your goods and services. It is the process of identifying potential consumers and guiding them through a number of processes until they are ready to make a purchase.
A sales funnel is critical to any marketing plan, whether you are establishing a new online business or have an established eCommerce store. You’ll leave a lot on the table and miss out on prospective clients if you don’t have a sales funnel.
Understanding and improving each stage of your customer journey will allow you to create the ideal sales funnel that will help you generate more leads and raise your conversion rate.
Fortunately, building a sales funnel using WordPress is rather simple. You only need a WordPress plugin, a well-thought-out customer path, and your product.
This article will cover all you need to know. We’ve got you covered on everything from what a WordPress Sales Funnel is and the different stages to how to design a sales funnel.
Let’s get started right away!
What Exactly Is a Sales Funnel? What is its purpose?
Your customer’s journey is represented by a sales funnel. It represents a set of stages from discovering your product or service to becoming a devoted customer. It is a step-by-step procedure for directing qualifying leads to the sales process.
You’ve probably seen those sales funnels if you’ve ever tried to sell something online. Every business owner’s initial thought is why they should establish a WordPress Sales Funnel. The solution is simple: if you want to enhance revenues, you need a sales funnel.
While marketing, email, and social media may all generate leads and revenue, a sales funnel is the most effective approach to improve earnings.
Stages of a Sales Funnel
The specific stages will vary based on the product or service you are advertising.
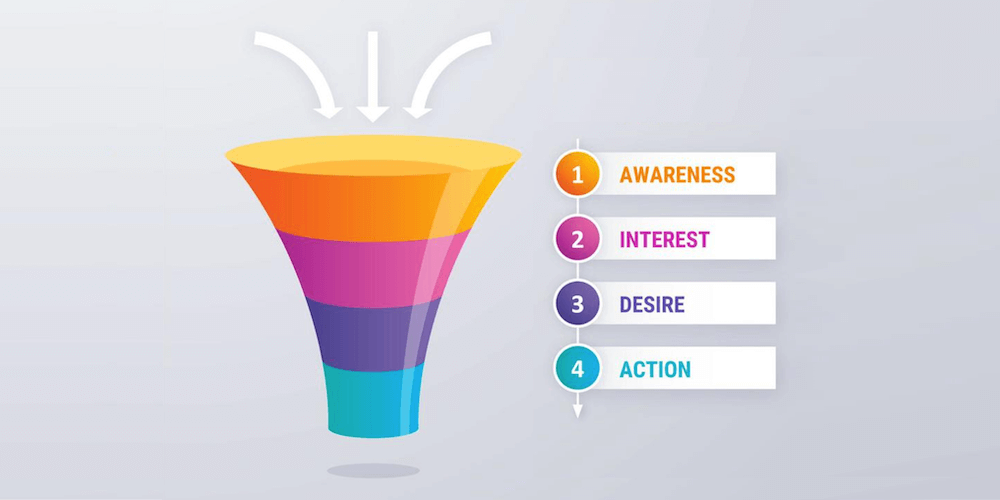
In any event, a sales funnel may be divided into four stages:
- Awareness
- Interest
- Desire
- Action
It’s known as the AIDA principle.
Awareness
This is the stage at which the prospect is introduced to your product or service and made aware of its existence. This may be accomplished through blog postings, podcasts, YouTube videos, social media, advertisements, and other marketing approaches.
Interest
If the prospect is interested in your product or service, they will go to the following step in the sales funnel. They’ll want to know more about your product and pricing at this point. Informational material, like how-tos, product reviews, or video tutorials, may pique your prospects’ interest in this area.
Desire
The lead will determine if they want to buy your product or service. They should add it to their virtual cart so they can checkout.
Action
The prospect completes payment and becomes your client at this step. A fantastic checkout experience guarantees that your prospect does not abandon the basket and completes the whole checkout procedure. While these are the four main steps of any sales funnel, another important stage is re-engagement.
Re-engagement
It is simpler to sell to an established customer than to a new one. So, although it’s critical to produce a consistent flow of prospects into your WordPress Sales Funnel, it’s also critical to nurture your existing clients.
Create a list and send out frequent newsletters that are more useful than a sales pitch. You will have created a loyal consumer base by cultivating your existing customers.
Why Is a Sales Funnel Necessary? (5 Key Benefits)
A sales funnel is a crucial component of any marketing plan, and it offers numerous major advantages.
The five most essential advantages are stated below.
- Obtain new leads and prospects.
When you create a sales funnel, you simplify your sales process and turn it into an automated system. This implies that you may begin directing prospects through your funnel as soon as they express an interest.
- Simplify your marketing
You may simplify your marketing by automating the sales funnel. By gathering all relevant information, you may use an automated sales funnel to produce a collection of relevant material that is sent out to prospects. With the information you’ve gathered, you may contact your prospects and begin a fresh sales discussion.
- Develop connections and trust with your prospects.
Once you have your prospects’ contact information, you can begin your discussion and begin to establish trust, connections, and confidence. If you do not invest time in developing connections and trust, you will lose a significant chunk of your WordPress Sales Funnel. You can bring up new product features that your prospects might be interested in throughout the chat. This will most likely result in more business and money while also developing trust and connections.
- Boost your conversion rate
Not every visitor to your website will convert. You will be able to generate more leads and establish relationships while minimizing the number of prospects who drop out if you create a highly optimized sales funnel. - Estimate your sales volume
One of the greatest strategies to anticipate your future sales volume is to create a sales funnel. This will enable you to design a collection of sales materials suited to your audience while gathering all of the required information from them.
Once you have all of the relevant information, you can simply anticipate the sales volume.
How to Make a Sales Funnel in WordPress for Free
Now that you’ve seen a sales funnel in action, it’s time to create your own. You’ll have a fully functional funnel ready to help convert new customers in just 5 simple steps.
Creating a WordPress Sales Funnel is the first step toward automating a sales process that produces consistent results. Once you’ve created a sales funnel, you can easily automate other aspects of your business with a few changes.
Let’s build a sales funnel!
Step 1: Make a WordPress Website
The initial step is to set up a WordPress website. You’ll need a dependable hosting service that provides managed WordPress hosting for this.
While there are numerous choices, we recommend Bluehost.

Bluehost is a dependable hosting service that is user-friendly and offers a variety of affordable plans for almost any type of business. Bluehost also provides a free domain name, as well as free SSL and email accounts.
Bluehost’s one-click WordPress installation is our favorite feature. Simply click on the installer, and you’ve created a WordPress website.
It’s time to update the look and feel of your website now that WordPress has been successfully installed. You must first install a WordPress theme.
WPfrank’s own BusinessExpo premium WordPress theme.

BusinessExpo is a multipurpose WordPress theme that can be used in almost any niche. It includes a slew of features, customization options, unlimited color options, and much more.
After you’ve installed your theme, you should install a few essential plugins to improve the functionality of your WordPress website.
You can, for example, install SEO, backup, and security plugins for your website.
Step 2: Set up WooCommerce.
We’ll need to install WooCommerce. because your sales page will require a checkout.

With WooCommerce, you have everything you need to create a fully functional online store. WooCommerce has it all, from product pages to checkout pages with lots of customization. Because of this reason, many owners move their stores from Shopify to WooCommerce.
The Setup Wizard will guide you through the entire installation of WooCommerce on your website. Simply follow the steps and you should be fine.
When the installation is finished, go to WooCommerce > Settings in your WordPress dashboard.

We recommend taking the time to understand the various tabs mentioned here, particularly the shipping and payments tabs.
WooCommerce provides several payment options, including Paypal and Stripe, that are easily integrated.
Step 3: Set up CartFlows
The following step is to set up a WordPress funnel builder. CartFlows will be used for this.
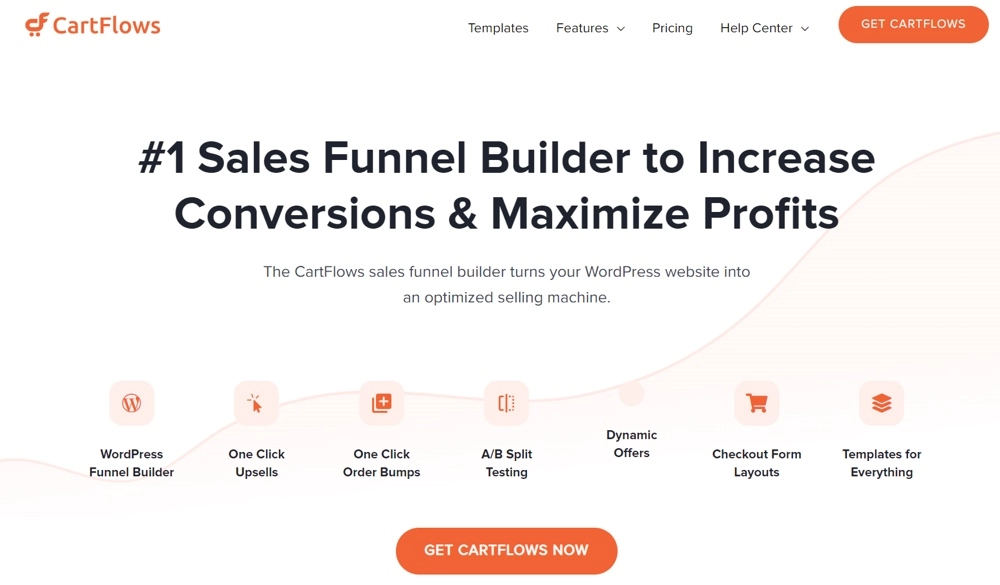
CartFlows is a popular WordPress sales funnel builder plugin that allows you to easily create advanced sales funnels. You could also increase each customer’s average order value by including upsells and order bumps.
CartFlows provides a free version that allows you to create an unlimited number of sales funnels, checkout pages, and thank you pages.
Install CartFlows from Plugins > Add New – just search for “cartflows” and it should come up first.
After you’ve enabled CartFlows, go to CartFlows > Settings.

You will be able to select your preferred page builder. As a result, you’ll be presented with pre-designed templates from which to build your flow.
When you’re finished, don’t forget to click Save Settings.
After you’ve finished configuring CartFlows, navigate to CartFlows > Flows.
This is where you will create your first flow, which will be a series of steps for your WordPress Sales Funnel.
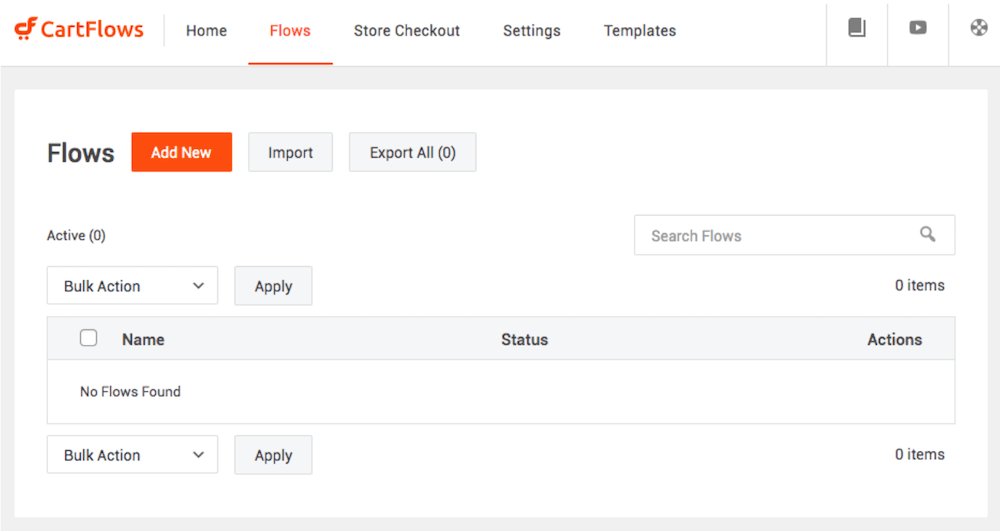
To begin, click Add New and select a template.
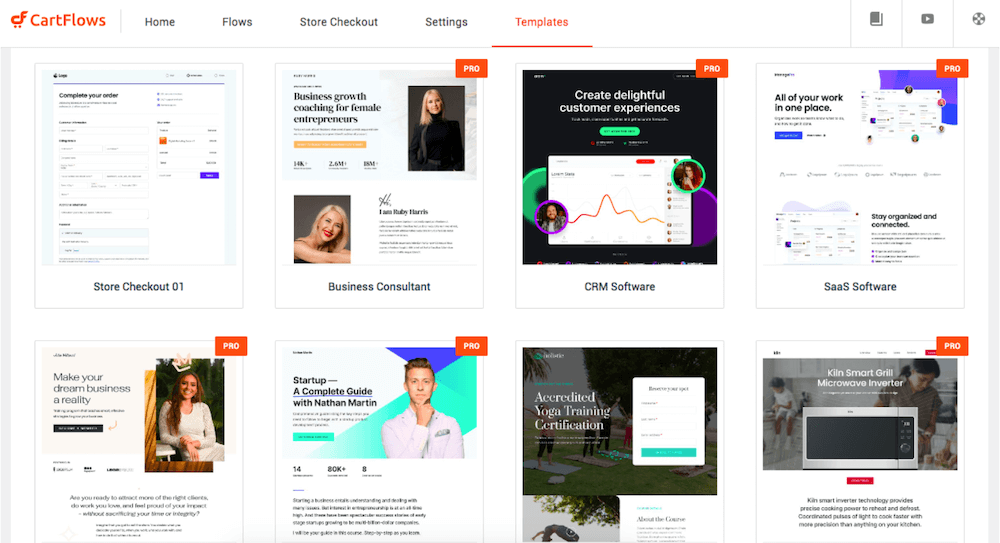
For example, we’ve chosen the “Business Consultant” template.
It will now display a list of pages, including the sales landing page, thank you page, and checkout page.
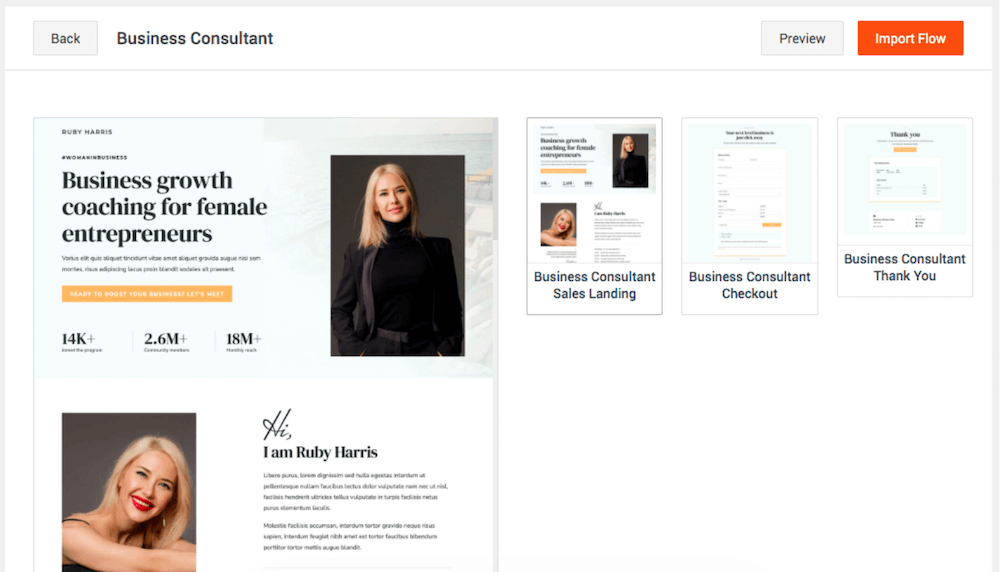
Are you content with the flow? If so, name your flow and then click Import Flow.

And with that, your flow is complete.

Do you want to rearrange the order of your pages? Not a problem! Simply swivel them around. You can also add new steps by selecting the Add New Step option.
Step 4: Include Products
On your checkout page, you may have noticed a ‘No Product Assigned’ label. This is due to the fact that we have yet to add a product to our checkout page.
Click on Edit to add a product.
Then scroll down the page to find the Checkout Layout section. Proceed to configure your checkout page.
Incorporate a product into your checkout page.

If you have CartFlows Pro, you can also add coupons and do other things on this settings page.
When you’re finished, click Save Settings.
You have added a product to the checkout page!
Step 5: Integrate Google Analytics
Wouldn’t it be great to know how effective your WordPress Sales Funnel is? Use website visitor tracking tools like Google Analytics to monitor how visitors arrive at your page and how they navigate through it.
With the built-in Google Analytics integration, CartFlows makes this a breeze.
Navigate to CartFlow > Settings and then Google Analytics.
Select Enable Google Analytics Tracking for CartFlows Pages and enter your Google Analytics ID.
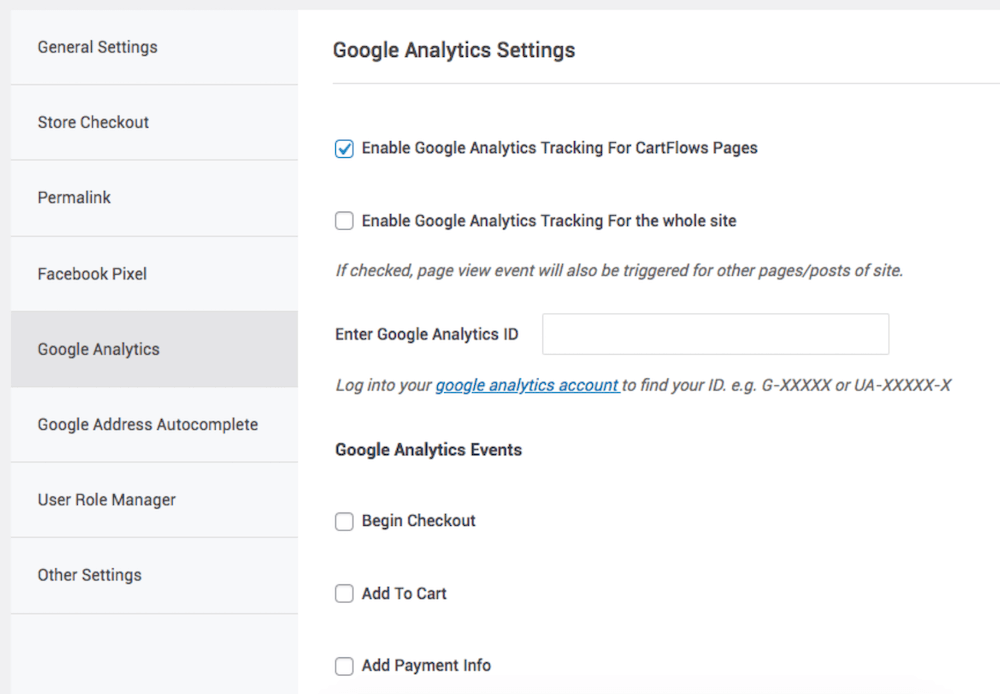
If you have a Google Analytics account, the ID can be found in your account dashboard. If you don’t already have one, you can create one with your Google account.
When you’re finished, as always, click Save Settings.
You are now ready to promote your highly optimized sales funnel in order to generate leads and increase sales.
Making the Most of Your Sales Funnel
A sales funnel that you build today may not work well tomorrow. Furthermore, what works well for one type of product or service may not work well for another type of product or service.
Your sales funnel may need to be tweaked as you learn more about your customers. That is perfectly acceptable. Conversion rate is a yardstick for measuring the success of your sales funnel.
For example, if you’ve created a WordPress Sales Funnel to generate more leads, you might want to compare the number of prospects who sign up to the number of prospects who land on your entry page.
Similarly, if you’re selling a product, you’d like to know how many prospects visited your landing page versus how many bought it.
Conclusion
Creating a sales funnel is critical for any business looking to expand online and increase revenue. To create a successful sales funnel, you must first understand the benefits of funnels and how they can help you achieve your objectives.
With a few changes, you can automate other parts of your business after you’ve built your sales funnel. We’ve got you covered on everything from what a WordPress Sales Funnel is and the benefits of having one to a step-by-step process for creating one.
