How To Quickly Resolve The ‘This Site Cannot Be Reached’ WordPress Error
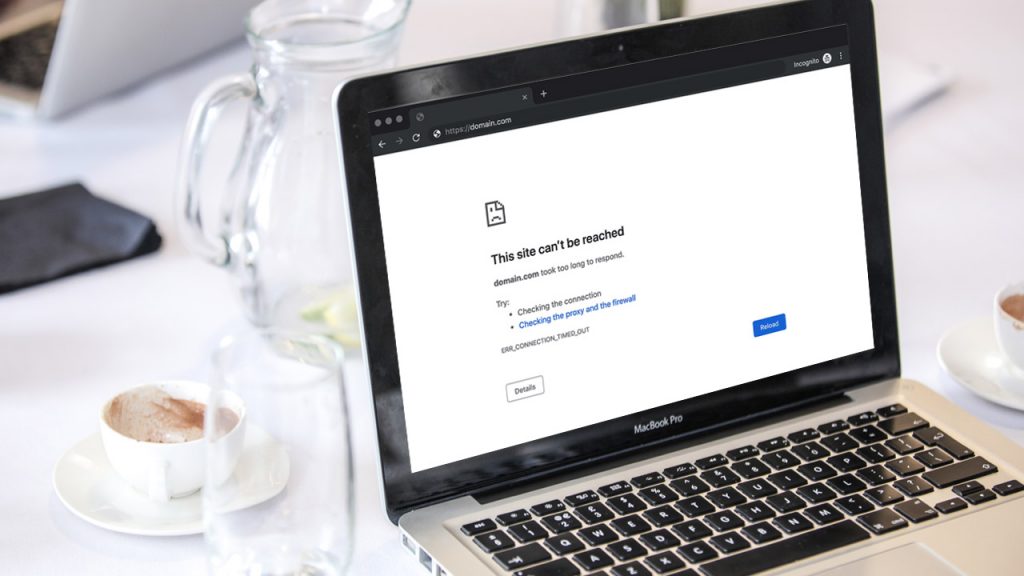
Do you want to know the simplest solution to resolve the ‘this site cannot be reached’ WordPress error? This issue can appear on any website, including third-party sites and your own WordPress blog. If this issue appears on your own website, it might prevent you from entering the admin section.
This post will teach you how to quickly resolve the ‘this site cannot be reached’ issue.
What Is the ‘This Site Cannot Be Reached’ WordPress Error?
There are other typical WordPress errors, but ‘this site can’t be reached is particularly aggravating because the message is ambiguous and doesn’t inform you what to do next.
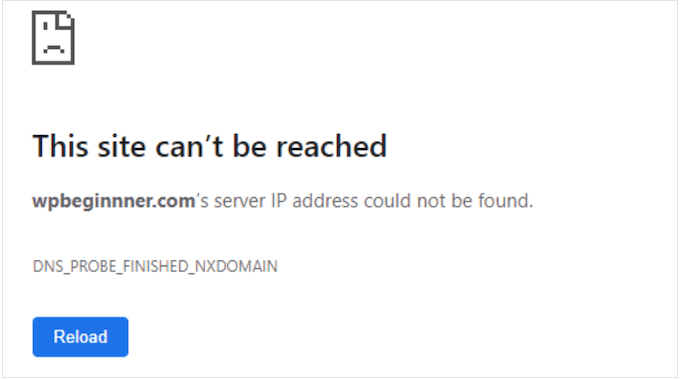
In the worst-case situation, you will be unable to access your own website. This will make testing your WordPress site, adding new content, installing security updates, and making other crucial changes impossible. Typically, the error indicates that something is preventing the browser from visiting the desired website. This might be due to an internet outage, a misconfigured network, or a problem with your DNS settings.
In this post, we’ll look at why you could be experiencing this issue, as well as look at the various error codes. When you meet an issue, you usually want to address it as soon as possible. That being said, there are a few techniques to debug this WordPress error, so you can rapidly resolve the site can’t be reached’ issue.
Make sure you’re connected to the Internet.
When debugging a mistake, it’s best to start with the simplest solution. To begin, ensure that you have internet access. If there is no evident problem with your internet connection, the next step is to restart it. Resetting your whole connection, similar to turning your computer off and on, can cure a variety of minor issues and get you back on track.
We recommend unplugging your router from its power supply and waiting at least one minute before reconnecting it. You can then return to the website to verify if the error notice has been deleted.
Remove the Browser Cache
Downloading files from a distant WordPress hosting server might take a long time. To address this issue, most current web browsers save files, data, and other stuff from websites that you visit. Instead of downloading content from a remote server, the browser can just load it from the local computer.
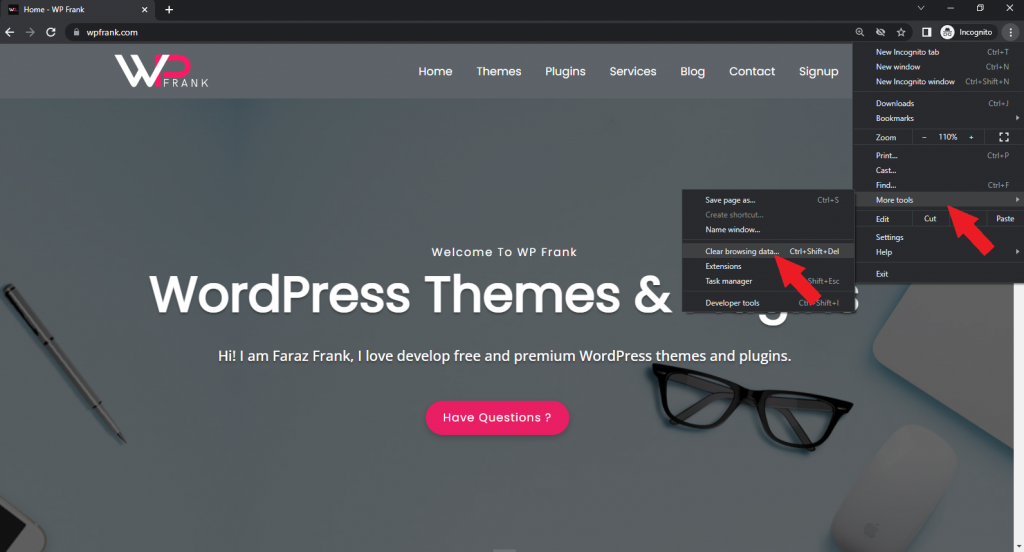
This helps web pages load quicker, but it can occasionally cause issues. Cached material, for example, might become obsolete or corrupted over time. Fortunately, clearing the browser cache is simple. Simply click on the three-dotted symbol in the upper-right corner of Google Chrome.
Then, choose ‘More Tools,’ then ‘Clear Browsing Data….’
Check the box next to ‘Cached pictures and files’ in the window that displays. By default, Google Chrome will remove the whole cache. Another alternative is to use the ‘Time Range’ selection to instruct Chrome to only remove items stored within a specific time period.
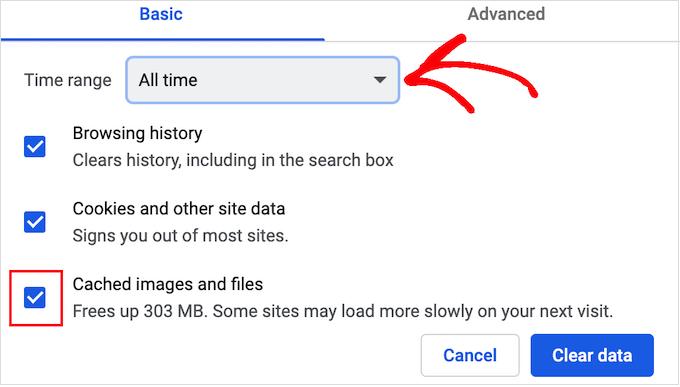
After that, you can check or uncheck any of the other choices. The ‘Surfing History’ checkbox, for example, is checked by default, but you may uncheck it if you wish to maintain your browsing history.
When you’re finished, click ‘Clear data.’
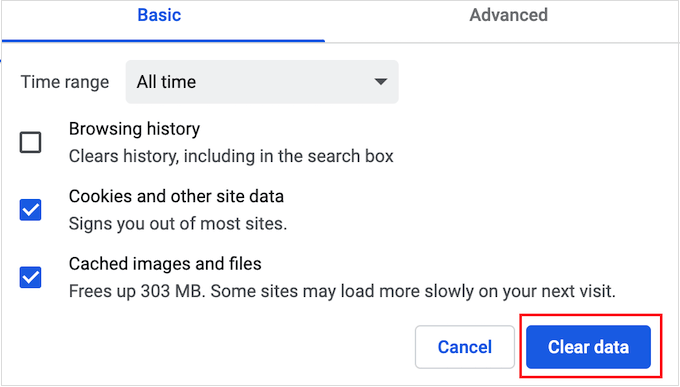
Google Chrome will now clear the cache. When it’s completed, go back to the website to see whether you’re still getting the ‘this site can’t be reached problem.
Turn off your firewall or anti-virus software
Antivirus and firewall plugins can keep you secure, but they can also block legitimate websites.
This might be due to an issue with how your security plugins and software are configured. Your settings, for example, may be overly stringent.
In other instances, the website may be configured in such a manner that it alerts your security software even though it does not offer a serious threat.
For example, if you’re currently developing your WordPress website, you may not yet have an SSL certificate. Many firewalls will prevent you from viewing a site that lacks a valid certificate, which may result in an error.
Simply disable the firewall or antivirus software to see whether it is preventing the connection. Then, go to the website that was displaying the ‘this site cannot be reached message.
If the site loads without a hitch, you’ll know the antivirus or firewall was to blame.
If this is the case, we do not advocate totally deactivating it.
Instead, examine the software’s options to see whether you can whitelist a certain website. You can view the site while also safeguarding yourself from hackers, malware, and other digital risks.
If you’re unsure where to look for these options, consult the software’s official manual, forums, or social media pages. You may also be able to contact customer support or the developer for assistance, depending on your program licensing.
Reset your Virtual Private Network (VPN).
A VPN can preserve your privacy, keep your information private, and allow you to access websites that are restricted or censored in your country.
However, if you’re using a VPN, your connection may fail or the VPN may not recognise your IP address. Some VPNs will reconnect automatically if a problem occurs, but you may need to rejoin manually.
If you receive the’site cannot be reached’ problem when using a VPN, we recommend consulting your provider’s website or manual for information on how to reset your VPN.
Turn off your proxy server.
A proxy server stands between you and the websites you’re attempting to access. Many individuals use middle-man’ servers as an additional degree of protection or to cache data.
If your proxy server is unable to connect to a website, you will receive the’site cannot be accessed’ message. This error may also appear if you are unable to connect to the proxy server in the first place.
The simplest solution in this instance is to just deactivate the proxy server. If you’re using a Mac, click the ‘Apple’ symbol in the toolbar.
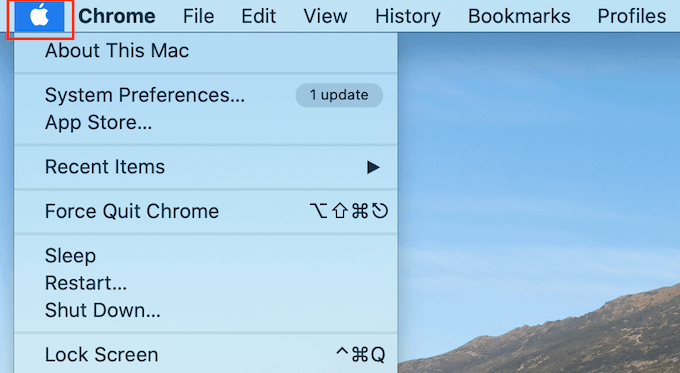
Then, choose ‘System Preferences…’
Click ‘Network’ in the box that displays.
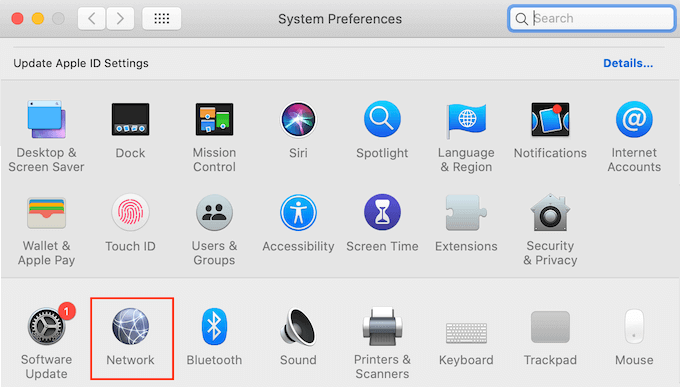
Select the network where you wish to disable the proxy settings from the left-hand menu.
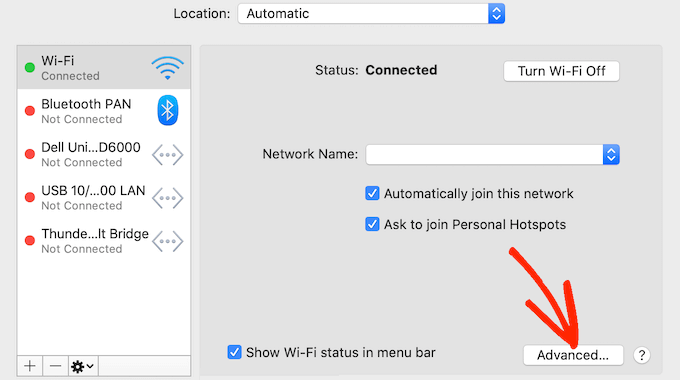
After that, click on the ‘Advanced…’ button.
Simply pick the ‘Proxies’ tab in the window.
Uncheck all of the protocols mentioned under ‘Select a protocol to configure’ immediately.
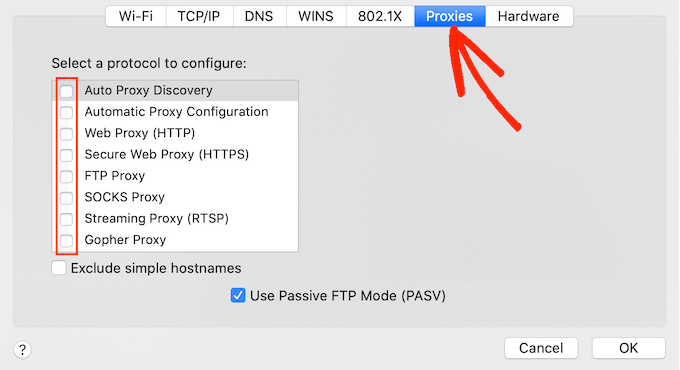
Finally, click the ‘OK’ button to save your modifications. You can now attempt to access the website to check if you have any issues.
Clear your DNS cache
Your computer, like the browser cache, saves the IP addresses of all the websites you visit. This eliminates the need for the browser to search for the same IP address several times.
This speeds up page loading, however, the cached DNS information might become out of the current. This may result in the site can’t be reached’ problem, especially if you’ve relocated the site to a new domain name or migrated WordPress to a new server.
You may receive the most up-to-date information about a website, including its new domain name or address, by clearing your DNS cache.
Modify Your DNS Server
DNS is analogous to the phone directory of the internet. Instead of showing people’s names and phone numbers, the DNS lists domain names and the IP addresses associated with them.
Your internet service provider will automatically give you a DNS server. However, this server may be inaccessible at times or contain incorrect information.
If your browser does not have the right address for a website, you will receive a ‘this site cannot be reached message.
This issue can be resolved by using an alternative public DNS server, such as Google Public DNS. You are free to use whatever public server you like, but keep in mind that your DNS provider will be able to see all of the websites you visit.
Many providers also gather personal information, such as your company email address, name, and phone number.
Having said that, it is advisable to conduct thorough research on your DNS provider.
When you’ve determined which DNS server you wish to use, it’s time to make the move. On a Mac, this is done by choosing the ‘Apple’ icon in the toolbar and then clicking on the ‘System preferences…’ option.
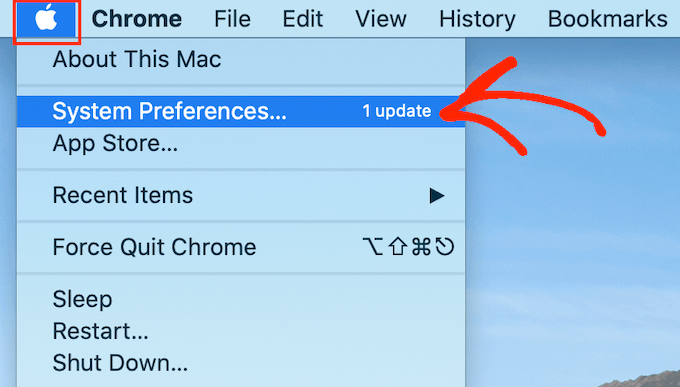
Select ‘Network’ in the window that displays, then click the ‘Advanced…’ option.
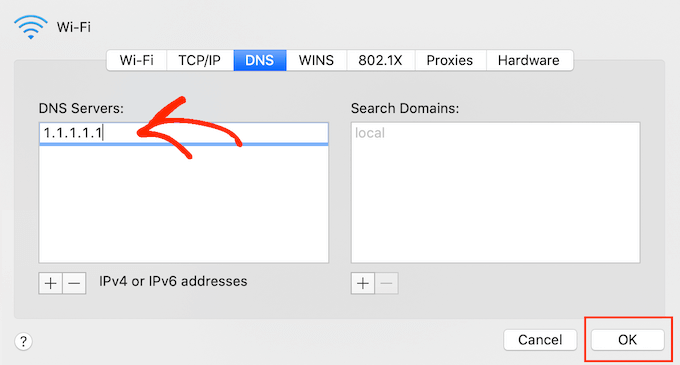
After that, navigate to the ‘DNS’ tab.
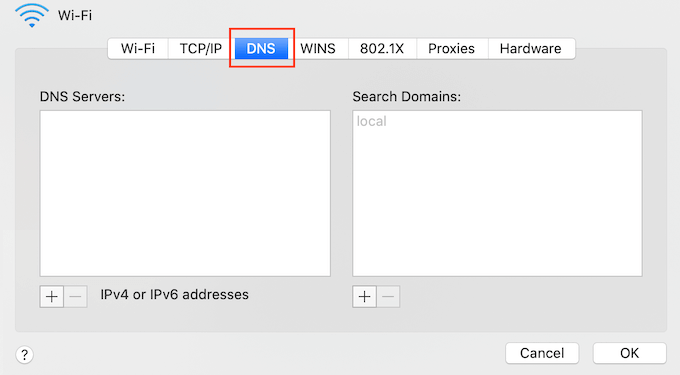
Click the ‘+’ button in the bottom-left corner.
This adds a new DNS server with IP 0.0.0.0 to the system.
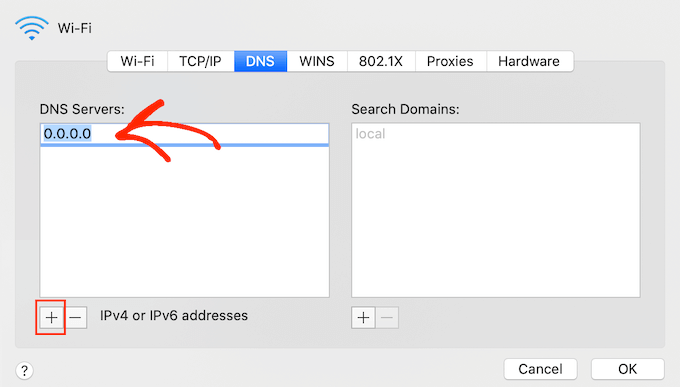
You may now enter the numbers for the public services that you wish to utilize.
Then, just press the ‘OK’ button to save your changes.
This returns you to the previous popup.
Click the ‘Apply’ button to begin utilizing your new DNS server.
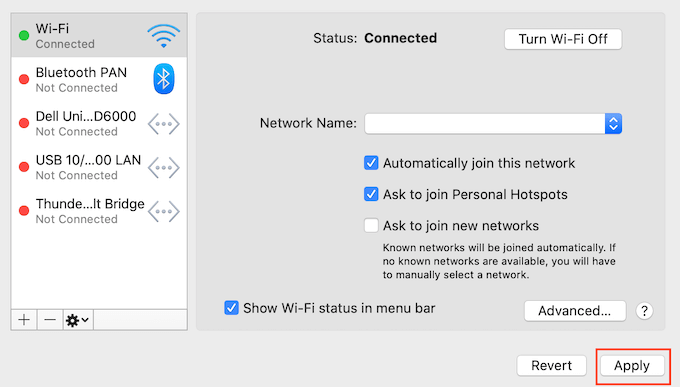
Finally, you may check the website to see whether the error message has been deleted.
TCP/IP settings should be reset.
TCP/IP (Transmission Control Protocol/Internet Protocol) is a set of protocols that govern how data is transmitted and received over the internet.
If your internet connection is misconfigured, resetting your TCP and IP protocol will reset the connection to its default settings, which may remedy the problem.
To reset TCP/IP settings on a Mac, click the ‘Apple’ icon in the toolbar, then ‘System Preferences…’
Select ‘Network’ in the window that displays, then click the ‘Advanced…’ option. After that, navigate to the ‘TCP/IP’ tab.
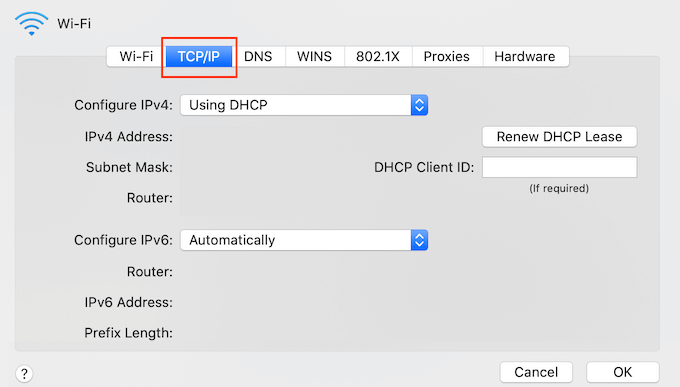
Go ahead and click the ‘Renew DHCP Lease’ option on this screen.
That’s all. You may now visit the website or blog to see whether you still get the’site cannot be accessed’ problem.
What Causes the WordPress ‘This Site Cannot Be Reached’ Error?
There are several possible causes for this error message, but the code that displays next to the message might help you narrow down the possibilities.
Let’s go further into these codes and what they signify for your WordPress blog.
- ERR CONNECTION RESET
Sometimes an ERR CONNECTION RESET code will appear next to the site cannot be accessed issue. This typically implies that there is an issue with your internet connection.
The most obvious issue is a network outage, but there are various software and settings that might disrupt the connection and cause an ERR CONNECTION RESET. VPNs and proxy servers, for example, can occasionally create this error number.
- DNS PROBE FINISHED NXDOMAIN
The Domain Name System (DNS) connects you to websites by matching a user-friendly domain name, such as www.wpbeginner.com, with the ID of the server on which this website is kept.
If Google Chrome is unable to resolve the domain name or address for the website you are attempting to access, you will see this error number.
Because it is unable to connect, the browser concludes that the domain name does not exist. It then displays a DNS PROBE FINISHED NXDOMAIN error code, where NXDOMAIN stands for ‘non-existent domain.’
If you notice this error code next to the’site can’t be reached’ warning, it typically signifies that your DNS settings are incorrect.